개발자 동빈나님의 유튜브 강의를 보고 개발한 JavaFx 채팅 프로그램입니다. 본 포스팅의 목적은 코드 기록과 코드 분석용입니다. https://ndb796.tistory.com/57
자바 FX(Java FX)를 이용한 서버 및 클라이언트 채팅 프로그램 ④ 클라이언트 기능 모듈 작성하기
이번 시간은 자바 FX(Java FX)를 이용한 서버 및 클라이언트 채팅 프로그램 개발하기의 네 번째 시간입니다. 바로 클라이언트 기능 모듈을 개발하는 것입니다. 일단 클라이언트 프로그램이라고
ndb796.tistory.com
채팅 프로그램은 간단하게 클라이언트와 서버 두 파트로 구분됩니다. 서버는 클라이언트 서버모듈과 서버 모듈로 나뉘고 클라이언트는 클라이언트 모듈로 구성되어있습니다. 서버, 클라이언트 서버, 클라이언트 순으로 리뷰를 하겠습니다.
Chat Server
서버는 다음과 같은 메서드로 구성되어 있습니다.
1. @Override start : Fx 프로젝트의 기본 메서드로 UI를 구현하거나 버튼 등에 이벤트를 연결시키는 부분입니다. 즉, 실질적으로 프로그램을 작동시키는 메서드입니다.
2. stopServer : 서버의 작동을 중지시키는 메서드입니다. 클라이언트와의 연결이 끊기거나 서버종료를 누를 때 작동시킵니다.
3. startServer : 서버를 구동시켜서 클라이언트의 연결을 기다리는 메서드입니다.
4. main : 프로그램의 진입점입니다. 기본으로 생성되며 아무것도 건드리지 않습니다.
코드를 살펴보기에 앞서 채팅 프로그램을 개발하기 위해선 소켓에 대해 알아야합니다. 소켓이란 컴퓨터 네트워크를 경유하는 프로세스 간 통신의 종착점입니다. 쉽게 말해 서버와 클라이언트가 있다면 서버는 Ip 주소와 port번호의 조합으로 자신의 소켓을 열어 클라이언트의 접속을 기다리고(listen) 클라이언트는 서버가 열어둔 소켓에 접속하기 위해 자신의 소켓을 열어 목적지(서버)를 찾아가는 것이죠. 따라서 서버 소켓, 클라이언트 소켓이 필요합니다.
소켓에 이어 스레드의 개념도 알아야 합니다. 스레드는 어떠한 프로그램 내에서, 특히 프로세스 내에서 실행되는 흐름의 단위를 말합니다. 쉽게 말해 통신의 단위라고도 볼 수 있습니다. 채팅 프로그램은 한 대의 서버와 여러 명의 클라이언트가 통신을 하는 것이기 때문에 각 클라이언트는 서버와 통신하기 위한 한 개의 스레드만 있으면 되지만 서버는 여러 클라이언트와 통신하기 위해 여러 스레드가 필요하고 이를 위해서 ExecutorService 데이터 타입을 가진 threadpool이라는 개념을 사용합니다. threadpool은 thread에 제한을 두기 때문에 갑작스러운 트래픽 초과로 인한 서버 장애를 방지할 수 있습니다.
public static ExecutorService threadPool;
public static Vector<Client> clients = new Vector<Client>();
ServerSocket serverSocket;
Main 클래스에 전역변수로 threadPool과 Client 객체를 담을 Vector 배열, serverSocket을 선언해줍니다.
1. start
@Override
	public void start(Stage primaryStage) {
		BorderPane root = new BorderPane();
		root.setPadding(new Insets(5));

		TextArea textArea = new TextArea();
		textArea.setEditable(false);
		textArea.setFont(new Font("나눔고딕", 15));
		root.setCenter(textArea);

		Button toggleButton = new Button("시작하기");
		toggleButton.setMaxWidth(Double.MAX_VALUE);
		BorderPane.setMargin(toggleButton, new Insets(1,0,0,0));
		root.setBottom(toggleButton);
		String IP = "127.0.0.1";
		int port = 9876;

		toggleButton.setOnAction(event -> {
			if(toggleButton.getText().equals("시작하기")) {
				startServer(IP, port);
				//바로 출력하는 것이 아니라 GUI 요소를 기다리고 출력해줘야한다.
				Platform.runLater(() ->{
					String message = String.format("[서버 시작]\n", IP, port);
					textArea.appendText(message);
					toggleButton.setText("종료하기");
					});
				}else {
					stopServer();
					Platform.runLater(() ->{
						String message = String.format("[서버 종료]\n", IP, port);
						textArea.appendText(message);
						toggleButton.setText("시작하기");
						});
				}
		});
		Scene scene = new Scene(root, 400,400);
		primaryStage.setTitle("채팅 서버");
		primaryStage.setOnCloseRequest(event -> stopServer());
		primaryStage.setScene(scene);
		primaryStage.show();
	}

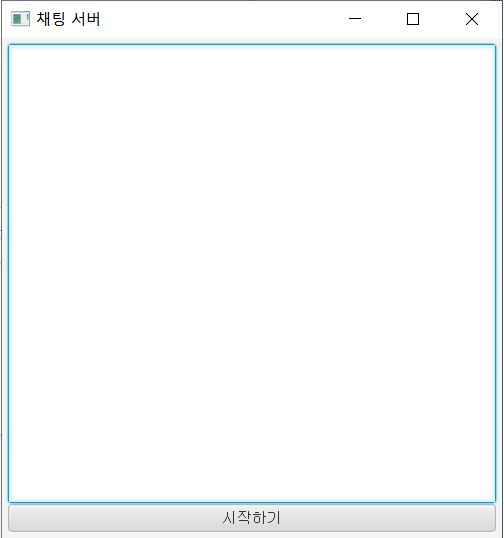
start 메서드는 UI를 구현하고 이벤트를 지정할 수 있습니다. 위 코드 중 중요한 부분은 [시작하기] 버튼이 눌렸을 때의 이벤트 부분입니다. 만약 버튼의 텍스트가 시작하기라면 startServer에 서버의 IP(127.0.0.1)과 포트번호(9876)을 인자로 넘겨주고, textArea에 [서버 시작] 이라는 메시지를 추가하고 버튼의 텍스트를 [종료하기]로 바꿉니다. 만약 버튼의 텍스트가 [종료하기]라면 stopServer()를 실행하여 서버를 끄고 반대의 과정을 거치죠.
여기서 Platform.runLater()는 왜 쓰이냐면 그 이유는 다음과 같습니다.
JavaFX UI는 스레드에 안전하지 않기 때문에 UI를 생성하고 변경하는 작업은 JavaFX Application Thread가 담당하고, 다른 작업 스레드들은 UI를 생성하거나 변경할 수 없습니다.
출처: https://palpit.tistory.com/entry/Java-JavaFX-스레드-동시성 [Palpit's Techlog]
JavaFX Application Thread가 start() 메서드를 실행하면서 UI를 생성합니다. 하지만 UI의 변경과 같은 경우는 작업 스레드로 진행해야 하지만 이는 JavaFx에서 금지되어 있기 때문에 작업 스레드는 UI 변경 코드를 Runnable로 생성하고, 이것을 파라미터로 해서 Platform의 정적 메소드인 runLater()를 호출하여 JavaFX Application Thread의 이벤트 큐에 넣습니다. 그러면 JavaFX Application Thread는 순서대로 이벤트를 처리하면서 UI의 변경까지 처리를 하는 것이죠.
2. startServer
public void startServer(String IP, int port) {
		try {
			//서버 소켓을 호출한다
			serverSocket = new ServerSocket();
			//서버컴퓨터 역할을 수행하는 컴퓨터가 특정한 클라이언트의 접속을 기다림
			serverSocket.bind(new InetSocketAddress(IP, port));
		}catch (Exception e) {
			e.printStackTrace();
			//서버소켓이 닫혀있지 않다면 서버를 닫아준다.
			if(!serverSocket.isClosed()) {
				stopServer();
			}
		}
		//클라이언트가 접속할 때까지 계속 기다리는 쓰레드
		Runnable thread = new Runnable() {
			@Override
			public void run() {

				while(true) {
					try {
						Socket socket = serverSocket.accept();
						clients.add(new Client(socket));
						System.out.println("[클라이언트 접속] " + socket.getRemoteSocketAddress() + " : " + Thread.currentThread().getName());
					}catch (Exception e) {
						if(!serverSocket.isClosed()) {
							stopServer();
						}
						break;
					}
				}

			}
		};
		threadPool = Executors.newCachedThreadPool();
		threadPool.submit(thread);
	}
serverSocket을 인스턴스화 한다음, InetSocketAddress 클래스를 바인드 해줍니다. 이로써 [서버 시작] 버튼을 눌렀을 때 전달받은 IPAdress와 Port번호로 서버소켓을 열고 대기합니다.
Runnable은 Thread와 같이 스레드를 할당해주기 위해 사용합니다. 이 두 가지는 차이점이 있는데요, Thread는 클래스로써 extends 상속을 받으면 다른 클래스를 상속할 수 없지만 Runnable은 인터페이스로써 다른 클래스를 상속할 수 있다고 합니다. Runnable 인터페이스는 다음과 같습니다.
@FunctionalInterface
public interface Runnable {
    /**
     * When an object implementing interface <code>Runnable</code> is used
     * to create a thread, starting the thread causes the object's
     * <code>run</code> method to be called in that separately executing
     * thread.
     * <p>
     * The general contract of the method <code>run</code> is that it may
     * take any action whatsoever.
     *
     * @see     java.lang.Thread#run()
     */
    public abstract void run();
}
이 Runnable 인터페이스로 구현한 스레드는 serverSocket.accept() 메서드를 통해 새로운 클라이언트가 들어올때까지 무한정 대기하다가 클라이언트가 접속하면 해당 클라이언트를 clients 벡터 배열에 추가하고, [클라이언트 접속] 로그를 띄웁니다. 이 스레드를 앞서 만든 threadPool에 submit합니다.
3. stopServer
public void stopServer() {
		try {
			//현재 작동 중인 모든 소켓 닫기
			Iterator<Client> iterator = clients.iterator();
			while(iterator.hasNext()) {
				Client client = iterator.next();
				client.socket.close();
				iterator.remove();
			}
			//서버 소켓 객체 닫기
			if(serverSocket != null && !serverSocket.isClosed()) {
				serverSocket.close();
			}
			//쓰레드 풀 종료하기
			if(threadPool != null && !threadPool.isShutdown()) {
				threadPool.shutdown();
			}
		}catch (Exception e) {
			e.printStackTrace();
		}

	}
Iterator은 자바의 컬렉션 프레임웍에서 컬렉션에 저장되어 있는 요소들을 읽어오는 방법을 표준화 하였는데 그 중 하나가 Iterator입니다. Iterator은 다음과 같은 인터페이스로 구현되어 있습니다.
public interface Iterator {
  boolean hasNext();
  Object next();
  void remove();
}
clients.iterator()에서 iterator메서드는 아래처럼 생겼고 Itr() 클래스는 벡터 배열을 Iterator 객체로 변환해서 return합ㄴ디.
public synchronized Iterator<E> iterator() {
        return new Itr();
    }
hasNext() 메서드를 사용하여 client 벡터 배열에 남아있는 Client 객체의 socket을 닫아주고 제거합니다. 이후 서버소켓 또한 닫아주고 threadPool을 shutdown해줍니다.
Client Server
클라이언트 서버는 서버와 클라이언트를 매게하는 모듈로써 클라이언트가 입력한 메시지를 받아들이고 이를 다시 접속해있는 클라이언트들에게 뿌리는 역할을 합니다.
클라이언트 서버는 두 개의 메서드로 구현하였습니다.
1. receive() : 클라이언트가 전송한 메시지를 읽어오는 메서드입니다.
2. send() : 전체 클라이언트에게 메시지를 보내는 메서드입니다.
1. receive
public void receive() {
		Runnable thread = new Runnable() {
			@Override
			public void run() {
				try {
					while(true) {
						InputStream in = socket.getInputStream();
						byte[] buffer = new byte[512];
						int length = in.read(buffer);
						while(length == -1) throw new IOException();
						//메시지가 온 곳의 소켓 어드레스와 스레드 이름을 print한다.
						System.out.println("[메시지 수신 성공]" + socket.getRemoteSocketAddress() + ": " + Thread.currentThread().getName());
						String message = new String(buffer, 0, length, "UTF-8");
						//전달받은 메시지를 다른 클라이언트에게도 전송
						for(Client client : Main.clients) {
							client.send(message);
						}
					}
				}catch(Exception e) {
					try {
						System.out.println("[메시지 수신 실패] " + socket.getRemoteSocketAddress() + " : " + Thread.currentThread().getName());
					}catch (Exception e2) {
						e2.printStackTrace();
					}
				}

			}
		};
		//threadpool에 thread 제출
		Main.threadPool.submit(thread);
	}
InputStream.read(byte[] b) 메서드는 입력 스트림으로부터 읽은 바이트들을 매게값으로 주어진 바이트 배열 b에 저장하고 실제로 읽은 바이트 수를 리턴합니다. 따라서 buffer에는 Input 값이 들어있고 String(buffer, 0, length, "UTF-8")을 통해 문자열로 인코딩하여 message 변수에 저장합니다.
이후 이 Runnable Thread를 Main의 threadPool에 submit 합니다.
2. send
public void send(String message) {
		Runnable thread = new Runnable() {
			@Override
			public void run() {
				try {
					OutputStream out = socket.getOutputStream();
					byte[] buffer = message.getBytes("UTF-8");
					out.write(buffer);
					out.flush();
				}catch (Exception e) {
					try {
						System.out.println("[메시지 송신 실패] " + socket.getRemoteSocketAddress() + " : " + Thread.currentThread().getName());
						//클라이언트가 서버에 접속이 실패한 경우이기 때문에 클라이언트 목록에서 현재 클라이언트를 제거해준다.
						Main.clients.remove(Client.this);
						socket.close();
					}catch (Exception e2) {
						e2.printStackTrace();
					}
				}
			}
		};
		Main.threadPool.submit(thread);
	}
send 메서드는 receive 메서드에서 socket.getInputStream()으로 받은 값이 있을 때만 OutputStream으로 보내주면 되기 때문에 while 무한반복문을 사용하지 않았습니다. 만약 송신에 실패한다면 clients 객체에서 해당 클라이언트를 제거한뒤 소켓을 닫아줬습니다.
Client
클라이언트는 소켓을 통해 서버에 접속 요청을 보내고 메시지를 보내며 다른 클라이언트가 보낸 메시지를 서버를 통해 전달 받습니다. 클라이언트 모듈은 다음과 같은 메서드들로 구성되어 있습니다.
1. @Override start : Fx 프로젝트의 기본 메서드로 UI를 구현하거나 버튼 등에 이벤트를 연결시키는 부분입니다. 즉, 실질적으로 프로그램을 작동시키는 메서드입니다.
2. startClient : 사용자가 서버 접속 버튼을 누르면 실행되는 메서드로 소켓을 열어 서버에 접속을 시도합니다.
3. stopClient : 통신 오류가 발생하거나 사용자가 종료하기 버튼을 누르면 실행되는 메서드입니다.
4. receive : 서버에서의 receive 메서드와 같이 서버로 부터 전송받는 메시지를 받아들이는 메서드입니다.
5. send : 사용자가 입력한 메시지를 서버로 전송하는 메서드입니다.
1. start
@Override
	public void start(Stage primaryStage) {
		BorderPane root = new BorderPane();
		root.setPadding(new Insets(5));
		HBox hbox = new HBox();
		hbox.setSpacing(5);

		TextField userName = new TextField();
		userName.setPrefWidth(150);
		userName.setPromptText("닉네임을 입력하세요");

		HBox.setHgrow(userName, Priority.ALWAYS);

		TextField IPtext = new TextField("127.0.0.1");
		TextField portText = new TextField("9876");
		portText.setPrefWidth(80);

		hbox.getChildren().addAll(userName, IPtext, portText);
		root.setTop(hbox);

		textArea = new TextArea();
		textArea.setEditable(false);
		root.setCenter(textArea);

		TextField input = new TextField();
		input.setPrefWidth(Double.MAX_VALUE);
		//접속하기 전에는 메시지를 못보내게
		input.setDisable(true);

		input.setOnAction(event -> {
			send(userName.getText() + " : " + input.getText() + "\n");
			input.setText("");
			input.requestFocus();
		});

		Button sendButton = new Button("보내기");
		sendButton.setDisable(true);

		sendButton.setOnAction(event-> {
			send(userName.getText() + " : " + input.getText() + "\n");
			input.setText("");
			input.requestFocus();
		});

		Button connectionButton = new Button("접속하기");
		connectionButton.setOnAction(event -> {
			if(connectionButton.getText().equals("접속하기")) {
				int port = 9876;
				try {
					port = Integer.parseInt(portText.getText());
				}catch (Exception e) {
					e.printStackTrace();
				}
				startClient(IPtext.getText(), port);
				Platform.runLater(()-> {
					textArea.appendText("[채팅방 접속]\n");
				});
				connectionButton.setText("종료하기");
				input.setDisable(false);
				sendButton.setDisable(false);
				input.requestFocus();
			}else {
				stopClient();
				Platform.runLater(() -> {
					textArea.appendText("[채팅방 퇴장]\n");

				});
				connectionButton.setText("접속하기");
				input.setDisable(true);
				sendButton.setDisable(true);
			}
		});
		BorderPane pane = new BorderPane();
		pane.setLeft(connectionButton);
		pane.setCenter(input);
		pane.setRight(sendButton);

		root.setBottom(pane);
		Scene scene = new Scene(root, 400,400);
		primaryStage.setTitle("채팅 클라이언트");
		primaryStage.setScene(scene);
		primaryStage.setOnCloseRequest(event -> stopClient());
		primaryStage.show();
		connectionButton.requestFocus();
	}

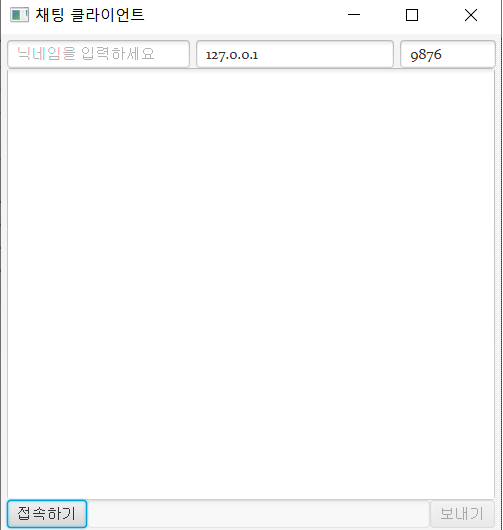
UI 구현하는 부분은 넘어가고 접속하기 버튼(connectionButton) 부터 보면 접속하기를 누르는 순간 startClient에 IP와 port번호를 매개변수로 넘겨주고 textfield 와 보내기 버튼을 활성화시킵니다. 또한 textArea에 접속했다는 문자열을 추가하고 접속하기 버튼을 종료하기 버튼으로 바꿉니다. 종료하기로 바뀐 버튼을 누르면 stopClient와 함께 이전 상태로 돌립니다.
보내기 버튼을 누르면 send 메서드를 닉네임과 내용을 매개변수로 호출합니다.
2. startClient
public void startClient(String IP, int port) {
		//서버 프로그램과는 다르게 여러 스레드를 쓸 이유가 없기 때문에 단독 쓰레드 사용
		Thread thread = new Thread() {
			public void run() {
				try {
					socket = new Socket(IP, port);
					System.out.println("[서버 접속 성공]");
					receive();
				}catch (Exception e) {
					if(!socket.isClosed()) {
						stopClient();
						System.out.println("[서버 접속 실패]");
						//프로그램 종료
						Platform.exit();
					}
				}
			}
		};
		thread.start();
	}
클라이언트는 여러개의 스레드가 필요없기 때문에 Thread 클래스를 사용하여 단독 스레드를 구현합니다. 매개변수로 받은 IP와 Port를 소켓 클래스의 인자로 전해줘 소켓을 엽니다. Socket 클래스는 다음과 같이 구현이 되어있습니다.
public Socket(String host, int port)
        throws UnknownHostException, IOException
    {
        this(host != null ? new InetSocketAddress(host, port) :
             new InetSocketAddress(InetAddress.getByName(null), port),
             (SocketAddress) null, true);
    }
이후 receive 메서드를 호출하여 서버로 부터 메시지를 받기 위해 대기상태에 진입합니다.
3. stopClient
public void stopClient() {
		try {
			if(socket != null && !socket.isClosed()) {
				socket.close();
			}
		}catch (Exception e) {
			e.printStackTrace();
		}

	}
클라이언트의 소켓을 닫아줍니다.
4. receive
public void receive() {
		while(true) {
			try {
				InputStream in= socket.getInputStream();
				byte[] buffer = new byte[512];
				int length = in.read(buffer);
				if (length == -1) throw new IOException();
				String message = new String(buffer,0,length,"UTF-8");
				Platform.runLater(()->{
					textArea.appendText(message);
				});
			}catch(Exception e) {
				stopClient();
				break;
			}
		}
	}
서버의 receive 메서드와 같습니다. 서버로 부터 메시지를 받아 이를 textArea에 붙입니다. 만약 에러가 나면 stopClient를 호출하여 소켓을 닫습니다.
5. send
public void send(String message) {
		//보내기 위한 스레드
		Thread thread = new Thread() {
			public void run() {
				System.out.println(message);
				try {
					OutputStream out = socket.getOutputStream();
					byte[] buffer = message.getBytes("UTF-8");
					out.write(buffer);
					out.flush();
				}catch (Exception e) {
					stopClient();
				}
			}
		};
		thread.start();
	}
send 메서드는 사용자가 입력한 메시지를 인자로 받아 socket을 통해 서버로 전송합니다. 만약 에러가 나면 stopClient를 호출합니다.
끝
